Precision-formed carbon steel shims take up the gap and center the bolt body after truing the receiver with the .715" Bolt-Way Reamer. Saves time and effort by eliminating the need to fabricate shims from scratch. To install, undercut the bolt body to accept the shims and solder or adhere them in place with the included retaining compound. Front and rear two-piece shims are manufactured to precise tolerances and pre-contoured to ensure a perfect fit on any .700" diameter bolt body. After installation, machine shims to .7135"-.7145" O.D. to provide proper clearance for snug bolt fit and ensure reliable cycling.
SPECS: Carbon steel, polished finish. Front Shims Nominal .400 (10.2mm) wide x .012 (.305mm) thick. Rear Shims Nominal .700 (17.8mm) x .012 thick. Includes front and rear shims, retaining compound, and complete instructions.
Mejora tu precisión con el BOLT BODY SHIM SET de BROWNELLS
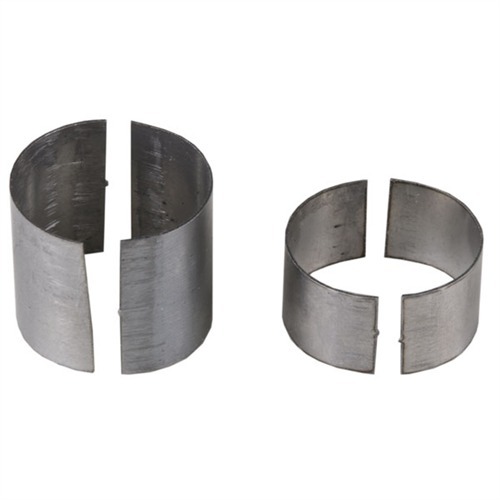
El BOLT BODY SHIM SET de BROWNELLS es la solución perfecta para centrar el cuerpo del perno después de ajustar el receptor con el reamer Bolt-Way de .715". Estos shims de acero carbono, formados con precisión, eliminan la necesidad de fabricar shims desde cero, ahorrando tiempo y esfuerzo.
Descripción del producto
Para instalar, primero debes hacer un corte en el cuerpo del perno para aceptar los shims y luego soldarlos o adherirlos en su lugar con el compuesto de retención incluido. Los shims de dos piezas, tanto frontales como traseros, están fabricados con tolerancias precisas y pre-contorneados para asegurar un ajuste perfecto en cualquier cuerpo de perno de .700" de diámetro.
Después de la instalación, se recomienda mecanizar los shims a un diámetro exterior de .7135"-.7145" para proporcionar el espacio adecuado para un ajuste ceñido del perno y garantizar un ciclo fiable.
Especificaciones
- Material: Acero carbono, acabado pulido.
- Shims Frontales: Ancho nominal de .400" (10.2mm) x grosor de .012" (0.305mm).
- Shims Traseros: Dimensiones nominales de .700" (17.8mm) x grosor de .012".
- Incluye shims frontales y traseros, compuesto de retención e instrucciones completas.